 We got crafty and made some homemade ornaments for family this year! Now that I have a little one, every little thing seems like a memory I must preserve somehow. What better way to save Liam’s hand print than to make an ornament out of it for the tree? I bet most kids are on winter break now, too, so here’s a great project you can do together.
UPDATE Dec 2012: Thanks for all the love on this post! This year we made a Hand Print Star Tree Topper for our Christmas tree … be sure to check that out, too, for another fun DIY holiday craft idea.
I saw a picture of a hand print Santa floating around Pinterest recently but there was no how-to, so I decided to replicate the idea and turn it into a special gift to celebrate Liam’s first Christmas. We even made the clay together, too! The best part? This project was “free” for me to make since I already had all the materials at home, and I bet you do, too! Here’s how we did it:
First you’re going to need some clay. Teaching 4th grade and making salt dough maps of Indiana in the classroom paid off; here’s the recipe I used to make the perfect salt dough clay:
Perfect Salt Dough
1 cup all purpose flour
1/2 cup salt
1/2 cup lukewarm water
 Mix the flour and salt thoroughly in a large mixing bowl, and add the water. Use your hands to combine it all really well and begin forming “dough.” Knead, knead, and knead some more until you get the right consistency. I found that if it was a tad too dry to form the perfect ball of dough that all I needed to do was wet my hands a little and get back to kneading. Â You want a nice soft, smooth ball of dough to work with. Not too grainy or dry, and not too sticky.
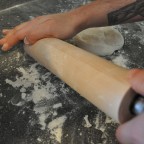
Sprinkle flour on your work surface and grab a rolling pin. It’s kind of like making holiday sugar cookies now; roll your dough out to form an even, flat disc of dough. I didn’t grab a ruler or anything so I can’t tell you exactly how thick or thin we rolled our dough out to, but remember that you need it to be thick enough so that when the hand is pressed into the dough that the indention doesn’t make the ornament too thin in places, and thus super fragile.
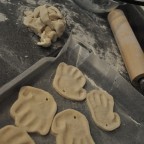 Making the hand prints with a 5.5 month old took two sets of hands. (Not including Liam’s hands!) Lucas held Liam and I pressed his hand into the dough. With his hand down, I made sure to give a little extra (gentle) press of each finger and the heel of his hand to ensure a good impression. Then I just rotated the dough and we repeated the process until I had eight little hand prints. If the dough is a little sticky, rub some flour on your kiddo’s palm before pressing. It helps!
When the hard part was done, I used a sharp knife and cut out around the edge of each hand print, leaving a thin edge around the whole hand. Don’t forget to punch a small hole near the heel of each dough hand print so that you can add a ribbon for hanging later! Remember that the hand is going to hang on the tree with its fingers down, since the fingers form Santa’s beard.
Now let the hand prints dry for about 4 days. Just like cut-out sugar cookies, we used a spatula to transfer the little hand print cut-outs onto a cookie sheet lined with parchment paper. Don’t bake them, though! Just set the cookie sheet in a safe place and let the hand prints dry out. In 2 days, turn each hand over so that the back side can also be exposed to the air and the ornaments can dry out all the way through. The waiting is actually the hardest part!
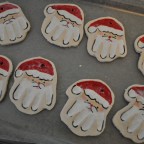 Now that you have perfectly hardened little hand prints, it’s time to paint! I like to spray each with clear acrylic spray sealer first, just to give me a good, smooth base for painting. For painting, I didn’t use anything fancy, just acrylic craft paints in red, white, black, and flesh tone.
I painted our Santas in layers, that is, that I went through and painted the swipe of skin tone on all of the ornaments first, then went back and painted the white pom pom in the thumb and made the white fur trim of the Santa hat next, and then did the red hat. By the time I had finished painting the same layer on all eight ornaments, the first one was dry enough to continue to the next paint layer. Then I went back with white and painted the length of each finger and had them meet up with the face to form the beard; I also did a quick set of “bumps” in white that overlapped the face a bit to create a mustache at the top of the beard. Then I gave all of my Santas a red dot nose. Once noses were done, I went back with a little pink that I made from mixing my leftover red and white on the palette to add dots for blushing cheeks, and a dot for the mouth just below the nose. I let everything dry for about 10 more minutes, and then I used black and a super fine paintbrush to add in details like outlining the mustache area, adding eyes, and outlining a bit on each finger of the beard and the pom pom to make those parts of Santa really stand out.
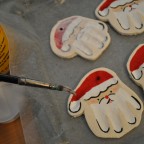 Let the paint dry thoroughly and then get out your Mod Podge. I gave the fronts two coats of Mod Podge each, allowing for ample time to dry between coats. (Until the white of the Mod Podge had gone completely clear.) Then I flipped the Santas over and got out my black paint and super fine paintbrush so that I could put Liam’s name and the year on the back. Once the black paint dried, I then gave the backs two coats of Mod Podge, too.
I gave both the front and back of each ornament a final quick spray with clear acrylic sealer just to add a finish to the entire project. This gave each ornament a little extra protection and a slightly glossy sheen. I also feel like it helps keep the ornaments from having a bit of a tacky, sticky feel from the Mod Podge.
 For the finishing touch, I strung up each ornament with festive red and green ribbon so that they could be hung on the Christmas tree. If the holes you made in the dough initially for this purpose are a bit clogged from all of the Mod Podge and spray sealer layers, grab something like the tip of a pen to punch through and clean out the opening so you can get your ribbon through.
And voila! Your child’s hand print is forever preserved as an ornament for the tree, and these ornaments make great gifts for grandparents and other family members. Don’t want to do Santa? No problem – just follow the steps to create the ornaments and when it comes time for painting, paint the whole thing a single color or decorate them another way. No matter how you paint, you’ve got the memory of your child’s hand print to keep.
I’m thinking of making these Santa hand print ornaments every year so that we can compare how Liam’s hand grows as he gets older, what do you think?
UPDATE Dec 2012: Thanks for all the love on this post! This year we made a Hand Print Star Tree Topper for our Christmas tree … be sure to check that out, too, for another fun DIY holiday craft idea.
Happy holiday crafting with your kids!



I love this idea and of course christmas is in 2 days. Why do you say not to bake them?
Baking salt dough for me hasn’t gone well in the past – the salt dries it out quickly, though so you shouldn’t need to bake it :) If you do decide to try baking it, I’d recommend doing so on low so you don’t burn it. Good luck!
Super cute!
They are super cute!!!!
I love this! What kind of paint do you recommend?
I love these they’re so cute! I’ve just painted mine in acrylic so fingers crossed it works :)
I don’t have any of the supplies to make these so I was making a list and I was just wondering, is it necessary to use Mod Podge and a clear acrylic spray? Or can I just get a Mod Podge clear acrylic spray and use that before and after painting? If I need to do both, you said you spray it before you paint, is that with a glossy or matte finish? Just wondering because I don’t want to mess it up!! Thanks in advance!
I didn’t realize I had several comments pop up on this post from last year, sorry!
We used craft acrylic paint – it worked like a charm!
You could use one or the other or both when it comes to the Mod Podge and/or acrylic spray. I had both already and I love using the acrylic spray as a final finisher – it’s not as sticky as the Mod Podge that I brushed on as a sealer. So I used the Mod Podge to seal everything, and then to help keep the Mod Podge coat from being so sticky after it dried, I used the spray acrylic sealer. Just a personal preference! (Funny enough, the spray acrylic stuff was also Mod Podge brand!)
As for matte or glossy, it’s also a personal preference – I think we used matte just so it wasn’t super shiny, but I think either would look beautiful :)
Just made these, they look great, although i did bake them on about 100 for a few hours, turning half way. i think they worked out ok. And i didnt seal them before painting…mainly because i forgot! Thanks!
I have a 2 month old and I want to make these! They are so precious and I know all the grandparents would love them! Everywhere else I’ve seen this recipe does say to bake them and since I live in a humid climate, I think I will have to bake them.
I just finished doing these with my youngest son who is 15 months and it was so much fun… After school my 4 year old is going to do them :) These are great and inexpensive gift to give to anyone and everyone. What grandparent wouldn’t want one of these homemade ornaments!
How many ornaments can you get out of one batch of the dough?
Amanda,
I easily got 8, but your mileage may vary depending on the size of your little one’s hand and how thin you roll the dough.
I’ve read that you can put them in the microwave to dry them out! How about using PVA glue to seal them, do you think that would work?
Ooh, I bet using a microwave in short bursts (not microwaving TOO long just in case) would work well. I haven’t tried! If someone does, let us know how it goes!
I’m not sure what PVA glue is, but any clear sealant glue should do the trick :) It’s mostly just to protect it.
my mom is makeing it and if we have extras what do we do with it
Hi Cameron,
I don’t think the dough is really good for anything else edible because it is so salty. BUT you can use the leftover dough to make other crafts or roll it out and use cookie cutters to make other ornaments. You can also just throw it away if you don’t have anything else you want to make. Note: if you ARE going to use the leftover dough to make other shapes or ornaments, do it FAST – the dough dries out very quickly and will soon not be of a good consistency to work with. Good luck!
I would use the leftover dough to make other ornaments with cookie cutters. It should be able to be rolled out several times without ruining the consistency – so find some smaller Christmas-themed cookie cutters and go to town! I bet older kids would love to paint the leftover ornaments and they would make a great gift FROM that child – or could be used as gift or stocking tags, as long as they had a hole punched in them. They could also be rolled thinner than the hand prints as there should be little to no indentation with a cookie cutter.
Or, if you are feeling super crafty, treat the dough as modeling clay and make different parts (e.g. house sides ala gingerbread; legs, bodies, and tails for polar bears or woodland critters; balls for snowmen, etc.), then glue the pieces together after they’ve dried. Once the glue is set, paint and seal. Add details by hot-gluing felt details on to your creations, such as scarves, mittens, “wreaths”, etc.
I will bet I could put these into a dehydrator. :)
cute idea!! can use feet to make rudolphs too….and feet for sleds…hands for reindeer.
oh my, somebody stop me lol
I have 4 kids, we can have a salt dough christmas tree!!
THANKS for sharing
I just made these with my two boys and every other website I saw said to bake in the oven at 250 for 2-4 hours. I also was told by a craft store employee that microwaving worked well. We did both. We microwaved a few (1 minute with the ornaments ‘sandwiched’ between two plates and 30 seconds without the top plate) and it worked pretty well. We put out handprint ornaments in the oven and I wish we hadn’t. They still turned out great but we had to bake them for way longer than 4 hours and then seemed to fill with air. We ended up finishing them in the microwave and then we didn’t paint them until the next afternoon to make sure they were completely dry and hardened.
I think we’re going to make foot print reindeer next!
Hi Chrissy!
I’ve not had much success with baking my salt dough creations in the oven in the past, but this year we decided to try making a hand print star tree topper and I used the recommendations from everyone who posted here on our Santa hand print ornament from last year and it worked well for us when we baked low and slow. 200F for 1:30 total. Read all about it here:
https://www.thekarpiuks.com/look-what-we-made-a-hand-print-star-tree-topper
Very Cute.If you would like the original in ceramic please visit my shop on etsy
I’m wondering if the dough would keep in a plastic zip bag or in a container? I would like to make these with my classroom of three year olds but can’t make the dough on the spot. I would like to have it prepped before we begin! What are your thoughts??
thanks!
Hi Rebekkah!
I don’t think the dough would keep well – the salt dries it out really, really quickly. Maybe try a test at home first – cut the recipe in half or even in quarters and make a smaller amount and put it in a Ziploc bag. I’m guessing it will dry out too much before you’re ready to use it; though maybe if you wet your hands a bit when you take it out of the Ziploc you’ll be able to re-knead it? Let us know how it goes!
hand printedsanta made with salt dough
hello i have a question for you i made these following a different website where i had to bake them for 3 hours once cooled i painted the front but when i went to flip over i noticed that they are not hard in the middle so im wondering do you think if i allow them to dry a few days like you do that maybe the rest of my ornament will be hard, even though i painted the front of them??? thanks
I would let them dry out a bit before sealing the back, if you feel like the inside is a bit soft still. I’d not put them back in the oven since you’ve painted the front side. Good luck!
So excited to you made the HOW TO! I’m doing this craft with my nieces and nephews tomorrow! I’m trying it out today!
I made the handprints painted them and sprayed them and now wrapped them and I was reading the direction and I forgot to mod Podge them. Are they ruined?
Hi Ryan!
I don’t think they are ruined, I’d just recommend sealing them with Mod Podge or some kind of clear sealant to … well, seal them and preserve them :) Good luck and happy holidays!
Hi I was just reading the last comment and I made these last year and never thought about a sealant. I made the ornaments and backed them then I painted them with acrylic and put a top gloss over them (unless that would coat), they still look great this year :D I want to do it again this year for another year of hands for the kiddos, just missed doing it before Christmas :(
I have had mine in the oven for 30 min and am pulling them out and letting them dry like you do. I didn’t like the idea of 3 hours in the oven. It’s been a while since I have made these, but I thought that sounded way too long. Mine may take a while longer to dry since I made them kind of thick. But oh well! Great tutorial and love your blog!
Thanks, ShaRhonda! I appreciate your kind comments :) I think if I were to bake mine I’d also keep it to about 30 mins or so – good luck!
How do you get them from not cracking. I have done four and all of them have cracked should I seal them first. Then paint. Love the Santa prints I’m doing them with my kinds and with a resident of mine that I work for
Hi Angie,
If you’re having a lot of cracking, try using a bit more water/flour and a little less salt in the dough. If it’s too grainy from the salt and there’s not enough moisture to make it really smooth and soft, the salt dries it out A LOT and can cause cracking. Also ensure you’re not making your pieces too thin. Once I make the shape of the hand print, I like to get a little water on my fingertip and gently rub along the rough edges and any small cracks I may see to help soften them. I hope that helps!
So I noticed I don’t have white acrylic paint, do you think I could use finger paint? I just need the white
@ Briann Neeley,
You can totally use white finger paint :) It should be just fine!
Hey! I was wondering if I use a permanent marker to write my baby girls name on these and then seal it would that be ok? We just want to keep it simple :)
Hi Cynthia Justine!
You can totally use permanent marker to write on them and then seal them. It should work just fine! I used a permanent marker to write my son’s name on the back of the hand prints before I sealed, and it still looks wonderful 2 years later. Good luck and happy holidays!
I made these with my kids. I saw how to make them on a page someone posted on Facebook. The directions I followed said to bake them at 300 degrees for 2 hours, I did and they turned out not so great. We are going to redo ours tonight and try putting them in the oven at 200 degrees for 30-45 min and then just air drying the rest of the way. I do have a question, for the sealer I will need, does Wal-mart sell it and what department would it be located in?
Delila,
The sealant is called Mod Podge. That is the brand. It would probably be in the craft section, but I can’t tell you for sure if Wal-Mart has it or not. Anything like that would be fine.
I am trying to make these but am having a very difficult time. They are getting stuck to the counter even when I floured the counter. So when I get them off they no longer look like my son’s handprint. What am I to do?
Erin,
Try putting down wax paper or parchment paper to cover your counter work space, in combination with the flour. It also sounds like your dough may be too wet and sticky if it’s sticking that much, even with flour. But definitely add a sheet of parchment paper or wax paper between your hand prints and the counter to help. Good luck!
I just now read everyone’s suggestions about leaving the ornaments to dry for a few days! I wish I’d known that because I planned on making these tonight and gifting them tomorrow! The recipe I read called for 100° for 3 hours (oven). I guess I’ll still give it a shot and hope for the best!
this thing looks asome
it worked so good and that my baby cousin loves it so much that every time she comes over she goes right to it.