 Liam turned one this past weekend, can you believe it?! I decided that he would need something extra special to wear as the guest of honor to his birthday party. Liam’s Aunt Lora had given him a cute faux tie onesie 3 months ago that he’s worn into the ground, but it inspired me to make my own version of a faux tie shirt to match the birthday theme. But you know I couldn’t just stop there… naturally, Lucas needed one of these shirts so that both father and son would match. (Lucas’ idea, I might add.) And then I might’ve made a little matching tie “shirt” for our schnauzer as well. I threw together some quick instructions and a PDF of the pattern I drew up & used in case you wanted to do something similar for the loves of your life, too!
Materials
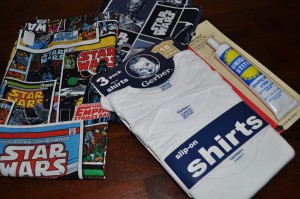
- T-shirts (Liam used Gerber pull-on shirts that came 3 in a pack, & Lucas used a white Hanes men’s t-shirt)
- Fabric for the ties; I grabbed a half yard, which was WAY more than needed. Grab a fat quarter; though you only need around a 9″ x 13″ swatch of fabric, depending on the print, you’ll want plenty so that you can be picky about the layout of the print on your ties. Our fabric was a cotton print.
- An iron
- Sewing adhesive (optional) OR fusible/iron-on material (optional)
- Sewing machine and matching thread
- The pattern
Instructions
Since Liam’s birthday party was Star Wars themed, (Like you didn’t see that coming) I grabbed a rad Star Wars cotton print at JoAnn Fabrics.  I ironed the shirts and the print fabric so that there were no ugly creases before I got started. (Okay, I might’ve lied about how well I ironed stuff first. But… you really should.)
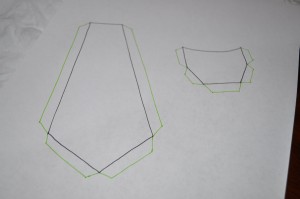
Cut out the pieces of the pattern. Arrange the pieces on the wrong side of your print fabric. I traced the pattern pieces on the back of the fabric with a ballpoint pen. But don’t cut yet!
Since most print fabric you’re going to pick up for this project is going to be cotton that will fray badly after it’s cut, I added these neat little “tabs” to the pattern pieces that I drew on the fabric before I cut the pieces out. I just free-formed these, and you can too. I don’t know how else to describe it except to sketch out what the tabs look like in relation to the pattern, for reference. (See sketch above.) Once I cut everything out, I can fold the tabs to the backside and iron them flat for a nice crease so that when I stitch the ties to the shirts, they won’t fray. See?
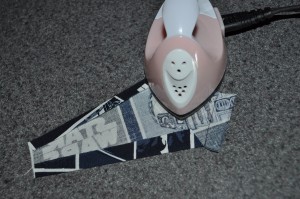
Cut out your pattern pieces (with tabs) from the fabric. Grab your iron. Oddly enough, we don’t own a full-sized iron, but somehow I have a mini craft iron instead. Isn’t it cute? Fold the tabs back and iron them flat to give your pieces a nice, crisp edge with no fraying.
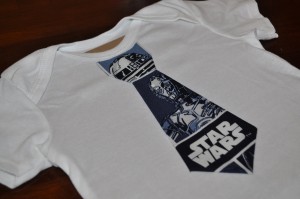
Now it’s time to arrange the pieces on your shirt! I used the neck edge of the kid’s shirt to make my pattern, and I found that it also fit nicely against the neckline of my husband’s shirt. Arrange the knot piece against the neckline. Slip the top edge of the tie just slightly under the bottom edge of the knot piece, so that the knot is overlapping the body of the tie just a little bit, for a more realistic effect. This is where I busted out a few drops of sewing adhesive; it helped to keep everything in place until Liam went down for a nap and I could get the sewing machine out. OR you could always use iron-on fusible webbing to attach everything to the shirt. If you plan to use adhesive, be sure to slip a piece of cardboard inside the shirt so that any excess glue doesn’t bleed through and glue your shirt together accidentally. Of course you don’t need this step at all if you’re comfortable just pinning everything down instead. I’m all about giving you options, people.
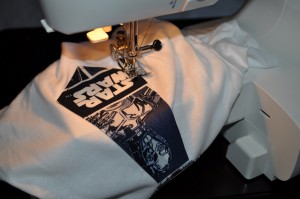
Bust out the sewing machine! With thread that matches your print fabric, stitch around the outside edge of your tie, including the knot.
That’s all there is to it! Repeat the steps above again to make the matching shirt.
Of course if you don’t have a sewing machine or aren’t comfortable sewing, you could solely use the sewing adhesive or iron-on fusible webbing to pull this off. I just liked the look of the stitched edge finish. I admit I was also skeptical that the sewing adhesive would stand the test of being washed as often as we wash Liam’s clothing. His clothes can take a beating!
And look! Our schnauzer has one, too! I modified the geekling-sized tie pattern to make it a little smaller. The “shirt” was cut from white felt using a real baby bib as my template. I sewed the mini tie to the white felt bib using the same above process, and we ended up with a matching tie for Liam’s best buddy Winston. Because, you know… why not?
The beauty of this project is in the choice of print fabric. Not into Star Wars? No problem. Grab a funky retro or dapper plaid print at your local fabric store. Or go online… there are a ton of amazing fabric prints out there for any interest, seriously. And if you STILL can’t find fabric to fit your needs or theme, get creative and make your own at Spoonflower by uploading an image or a design you’ve created. I’m making a tie onesie for a friend’s new baby, and for $5 + $1 shipping, I uploaded my own design and had it printed on an 8″ x 8″ “test” swatch… which is the perfect amount to make a single geekling tie… but not quite enough to make a set of matching geek dad + geekling ties, unfortunately, so keep that in mind. Spoonflower’s prices are pretty reasonable, though, and picking up a fat quarter’s worth of your custom design (an 18″ x 21″ swatch) is only $10.50 if you go with a basic cotton. Still less expensive than having custom shirts made or buying in the store. Why buy when you can DIY and make it exactly the way you want, with a heaping side of handmade love to go with it?
So there you have it, a quick and inexpensive way to create matching shirts for father and son that will surely make an impression at your next event… or anytime! You don’t really need a reason to whip up something this cute, though, if you ask me. Hope you enjoy!


2 Responses