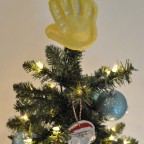
 Okay so apparently our Hand Print Santa Ornaments post from last Christmas is a HUGE hit. (51k+ views… wow, you guys! Glad you love it, thanks for all the love!) and as I was checking out the post, I read at the end how I was thinking maybe we would make hand print Santa ornaments every year, so that we could compare hand sizes as Liam grew. That got me to thinking… what else could we do with hand print ornaments? I looked at our tree, which was missing something. A tree topper!
And then it hit me. Hand print + tree topper = hand print STAR!
This time around I have the luxury of going through all of the great questions and comments left on the Santa hand print ornament post from last year to see if we could improve the process this year. Many of you asked about baking the ornaments to help them dry out faster. I’d had some not-so-successful incidents in the past with baking salt dough, but based on your suggestions, I tried baking them low and slow to help speed up the drying process this time. And it worked beautifully! (Thank you!) So here we go again…
 First you need to make the salt dough. The recipe I posted last year is still my favorite, so I’m going to nab that section of the instructions from the old post and paste it here:
Perfect Salt Dough
1 cup all purpose flour
1/2 cup salt
1/2 cup lukewarm water
Whisk the flour and salt thoroughly together in a large mixing bowl, and add the water. Use your hands to combine it all really well and begin forming “dough.†Knead, knead, and knead some more until you get the right consistency. I found that if it was a tad too dry to form the perfect ball of dough that all I needed to do was wet my hands a little and get back to kneading.  You want a nice soft, smooth ball of dough to work with. Not too grainy or dry, and not too sticky.
Sprinkle flour on your work surface and grab a rolling pin. It’s kind of like making holiday sugar cookies now; roll your dough out to form an even, flat disc of dough. I didn’t grab a ruler or anything so I can’t tell you exactly how thick or thin we rolled our dough out to, but remember that you need it to be thick enough so that when the hand is pressed into the dough that the indention doesn’t make the ornament too thin in places, and thus super fragile. (I think we left our dough a little thicker this year.)
Last year Liam was just shy of 6 months old when we did this… which means he’s nearly a year and a half old this time. HUGE difference in ease of getting a hand print from him! Remind me to thank his teachers for doing so many fun hand print crafts with the kids – he was way into the idea of pressing his hand into the dough to make hand prints and it was a breeze. (He totally wanted to make more.)
Notes about doing the hand print: Be sure to give a little extra (gentle) press of each finger and the heel of the hand to ensure a good impression. If the dough is a little sticky, rub some flour on your kiddo’s palm before pressing. It helps!
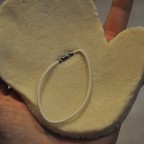
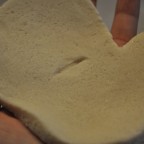
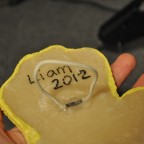
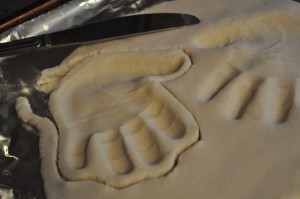 I used a knife to cut out around the edge of Liam’s hand print, leaving a thin edge around the whole hand. Now it was time to make it into a tree topper. This was the tricky part. Last year we poked a hole in the heel of the hand so that we’d be able to string the ornament with a ribbon to hang on the tree. This year we wanted the hand to be right-side up – fingers splayed – and painted like a star so that it could be used as a tree topper. But how the heck would we make the hand attach to the tree? I didn’t want holes and string to tie it on, so instead I gently flipped the hand print over and held it in my own hand and pressed the metal connector of an elastic hair tie into the middle of the back of the hand. See, my plan is to hot glue/super glue (and then even Mod Podge over that) an elastic hair tie to the back of the hand print. Then when it’s done I can slip the elastic loop over the branch of the Christmas tree that sticks up straight on top, to hold the star on. Make sense? Here’s a picture:
NOTE: You’re not going to press the hair elastic into the hand print TOO far… just enough to make a nice indent in the back of the print to fit the elastic into later. You’re also not going to bake the hand print with the elastic in it or anything – just use the elastic to make the indent on the back and then set the elastic aside for now. We’ll come back to it later!
YET ANOTHER NOTE: I know I talk a lot, but you should do this part pretty quick… from the minute you finish making the salt dough to the time it goes into the oven, because salt dough dries out FAST. If your dough is starting to dry but you’re not done shaping or doing the indent yet, dip the tip of your finger in lukewarm water and use your finger to gently rub along rough edges or small cracks that might start forming as the hand print tries to dry. This will help moisten the area just enough to smooth it out.
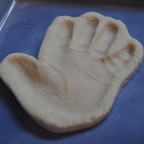 OKAY! So you have a hand print with an indent in the back. Lay the hand print (face up) on a cookie sheet. I recommend having some parchment paper between your hand print and the pan. Do as I say, not as I do… because you’ll notice that I was daring and didn’t. It turned out okay, but next time I’d use parchment paper.
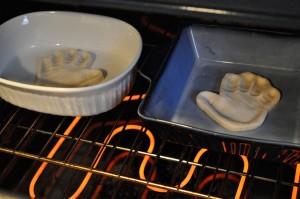
Pre-heat the oven to 200 degrees F. Put your cookie sheet in the oven on the middle rack. Let your hand print bake at 200 for 30 minutes, then carefully flip so that the back side is facing up now and let it bake for another 30 minutes. After an hour of baking, I decided to give it another good 15 minutes per side, so I flipped the hand back over face up, baked for 15 minutes, then turned it over for the final 15 minutes. If it doesn’t seem completely dried out, you can always bake for another 15 minutes per side until it is.
When you’re done baking, transfer the hand print (Careful! It’s hot!) to a safe surface to cool, and allow it to cool completely. Baking worked beautifully when done low and slow, and it was SO MUCH FASTER than waiting 4 days for the salt dough to dry out naturally. This means I was able to move on to painting, sealing, and displaying in the same day!
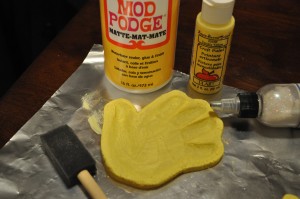 Now that you have perfectly hardened little hand prints, it’s time to paint! I like to spray each side with clear acrylic spray sealer first, just to give me a good, smooth base for painting. (This is optional!) For painting, I didn’t use anything fancy, just acrylic craft paint in yellow. I recommend grabbing one of those sponge-like brushes; it’s much easier than a regular paint brush when you’re just using one solid color. Oh, and don’t forget the (optional) glitter to make your star sparkle.
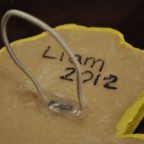
I painted the front side yellow and let it dry. Â Then I went to work on the back side. Remember the elastic? Grab it and some hot glue. Put some hot glue down into the indent you created on the backside. Press the metal part of the elastic into the indent and let the glue dry. For good measure, put a little extra glob of glue on top of the metal piece. When we use Mod Podge to seal the whole thing in a bit, we can add yet another layer of glue over this area with it.
Okay back to the front side! Grab your Mod Podge and a clean brush. Add a thick layer of Mod Podge on the front side to help seal it. You can optionally grab some glitter at this time and sprinkle it lightly over the first wet Mod Podge layer. Mod Podge takes a good 15-20 minutes per layer to dry; (longer depending on how thickly you brushed it on) I’d do a couple of layers. The first layer has your glitter, so you’ll seal that glitter in when you paint over with the second layer of Mod Podge.
When you’re done with the front, (I did 3 Mod Podge layers.) turn the hand over. Bust out a little black paint (or a black paint pen) and write the year on the back first. Then repeat the sealing process; Mod Podge layer, let dry, etc. until your hand print star is sealed front and back.
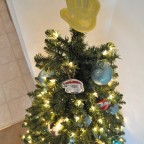 NOTE: I didn’t paint the backside yellow nor did I sprinkle it with glitter. Just wrote Liam’s name and the year. Of course you could do the backside the same as the front if you wanted.
I always like to do a final finishing spray coat of clear acrylic sealant. This is optional, but I find that it helps add a final layer of shine, protection, and reduces the stickiness of the Mod Podge.
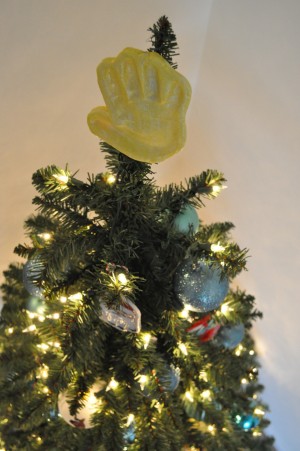
Use the elastic on the back to attach your star hand print to the top branch of your tree. TA DA! Just like magic.
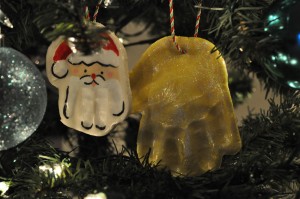
I made a second one to hang like last year (just painted it yellow also) so that I could compare the Santa from last year to this year’s hand print star. WOW look at the size difference!
Happy crafting and happy holidays! If you think of another good way to turn the hand print into a tree topper (i.e. have a better way to affix the star to the tree?) please mention it in the comments – others may like to see your suggestions and I can take them into consideration for next year’s hand print ornament project. :) Thanks!
What a great idea! Ours is in the oven now. My three year old daughter has been asking for a star to top our tree, but none of the ones I showed her have been up to par. She was extatic when I told her about this idea. Thanks for sharing :)
I hope it turned out well, Jessie! :) Thanks for commenting!
You could try making a reindeer and or christmas tree. Just google handprint reindeer for samples of pictures.
Love these ideas, Jenny! Thank you!
Hey Lesley, These are the cutest hand ornaments I’ve seen! Too Precious!! I just made my first batch yesterday & baked them as you’ve mentioned above but they’re still a little soft (I may have made them thicker & that’s the reason). I had to leave the house so couldn’t continue baking more. I’m letting them air-dry now. How many days did you previously let them air-dry? I’m trying to get them finished by Monday & hoping I have time to do that! Thanks so much & Merry Christmas to you & your family.
Tammy,
It’s really hard to say for sure how long to let them air-dry – I think I did about 3 days, and flipped them over at some point. The amount of time it takes to air them out completely will depend on the thickness; check them after a day or two and flip it over so that the underside can get exposed to air as well, and you’ll know they’re done when they feel solid all the way through. :) Good luck and happy holidays!
This is great! I plan on making the Santa ornaments with my grandchildren. I was wonder… With the Santa prints you didn’t bake, but with the tree topper print you did. Why the different methods and which works best? Thanks for the post!
Hi Melissa!
After making the Santa prints and posting about the process, a lot of people commented and several mentioned baking theirs to help the prints dry out faster. I decided the next year when we did it to try baking and see if that worked. Both ways worked for us so it’s really up to you! :) Good luck!